This setup guide is intended for people who have bought a SparkFun Bluetooth Mate and are looking to quickly get it working with their Arduino.
The Bluetooth Mate is really easy to use, but you have to know exactly how to configure Windows for it to work properly. Hopefully this quick guide will have you up and running in a few minutes, and will spare you from hours of wondering why you can't get the little green light to come on.
I am using:
WARNING!
I initially only bought the Arduino and the Bluetooth Mate, thinking that I could program the Arduino over bluetooth. I have not had any success making this work, so I don't think it's possible. Buy the FTDI USB breakout board too, since it's inexpensive and guaranteed to work without any hassle.
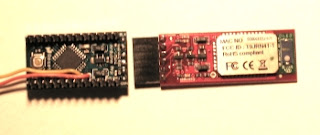
I chose to mount them on top of each other, using a right angle header like this:

Note that the serial speed is set to 115200, which is the default speed of the Bluetooth Mate.
This program spits out an increasing counter value on the serial line. It also accepts input from the user, in the form of typing the character 'R' which will reset this counter.
Program your Arduino board with this code, and make sure it's working over USB with the Serial Monitor (don't forget to set the serial monitor to 115200 as well!).


I saved this information as "Bluetooth Mate" on the Session screen for easy access later. Click on the open button.
Windows may ask you for a pairing code at this point, as it connects to the device for the first time. If so, enter "1234" without the quotes and it will pair.
Now with any luck this screen will pop up, and you will see your code displaying in all its glory:

You're done! Try typing R to reset and verify the code is working correctly (if not, who cares, you're on to bigger and better things now anyway).
Happy developing!
The Bluetooth Mate is really easy to use, but you have to know exactly how to configure Windows for it to work properly. Hopefully this quick guide will have you up and running in a few minutes, and will spare you from hours of wondering why you can't get the little green light to come on.
I am using:
- Bluetooth Mate (link)
- 3.3V FTDI USB programmer (link)
- Arduino Pro Mini 3.3V (link)
- Bluetooth USB dongle (link)
WARNING!
I initially only bought the Arduino and the Bluetooth Mate, thinking that I could program the Arduino over bluetooth. I have not had any success making this work, so I don't think it's possible. Buy the FTDI USB breakout board too, since it's inexpensive and guaranteed to work without any hassle.
Connecting the Modules
The Arduino Pro Mini and the Bluetooth Mate are perfectly matched for each other. You can connect them directly to each other like so:
I chose to mount them on top of each other, using a right angle header like this:

Setting up the Arduino
Before you get started with Bluetooth, you should set up the Arduino board to send something over the serial line, so you can make sure it's working. I made this quick program to test out send/receive:Note that the serial speed is set to 115200, which is the default speed of the Bluetooth Mate.
This program spits out an increasing counter value on the serial line. It also accepts input from the user, in the form of typing the character 'R' which will reset this counter.
Program your Arduino board with this code, and make sure it's working over USB with the Serial Monitor (don't forget to set the serial monitor to 115200 as well!).
Setting up Bluetooth
I primarily use Windows 7, and have had no problems. These steps should be very similar for Windows XP. I haven't been able to get it running with a mac yet, but if I do I will post instructions on that too. I assume that you have already installed the Bluetooth Dongle (it should auto-install once you plug it in). Also make sure the Bluetooth Mate is connected to the Arduino and is powered (it should be flashing the red LED every second or so).Step 1: Open the Bluetooth Menu on the Taskbar
Right click on the Bluetooth icon and click on Show Bluetooth Devices.Step 2: Click Add a Device
Step 3: Windows will discover the device
The device should appear as "FireFly-_____". Select the device and click Next. If the device does not show up, make sure it's powered and close to the Bluetooth dongle.Step 4: Pair the device
The next window will ask how you want to pair the device. It is critical that you choose to pair without a passkey. This is where I messed up, and it took me a while to figure out what to do.Step 5: Success! (hopefully)
The device should be paired successfully! Click the Close button to continue.Step 6: Open Device Manager
Expand the Ports section. You want to see which port names have been assigned to the device. Take note of the first one of the two (in my case it's COM10). We use this in the next section.
Sending/Receiving Serial Data
I used a program called PuTTY because it's simple and free. Here is how I set it up:
I saved this information as "Bluetooth Mate" on the Session screen for easy access later. Click on the open button.
Windows may ask you for a pairing code at this point, as it connects to the device for the first time. If so, enter "1234" without the quotes and it will pair.
Now with any luck this screen will pop up, and you will see your code displaying in all its glory:

You're done! Try typing R to reset and verify the code is working correctly (if not, who cares, you're on to bigger and better things now anyway).
Happy developing!
Hey, I'm pretty sure I followed your tutorial almost exactly but I'm getting no output when I open the PuTTY terminal. The device pairs successfully but the terminal remains blank. I'm using an Arduino Uno unlike your Mini but I've heard that they can be used interchangeably. Currently I have it wired as follows...
ReplyDeleteBT TX -> Arduino Digital Port 2.
BT RX -> Arduino Digital Port 3.
I've also tried connecting the BT CTS and RTS ports to each other but no success.
I am having a similar issue. Once I connect to putty, the terminal opens but the screen remains blank and the Bluetooth light stays Red. Any ideas on how to fix this?
DeleteIts not working, I am using UNO with BT JY-MCU (from DX), evrything worked fine except the Putty did not open, it beep me when Itry to open
Deleteappriciate your help
Hey rEgonicS,
ReplyDeleteI haven't hooked up the Bluetooth Mate to anything other than an Arduino Mini, but I can clarify the pin connections:
Bluetooth Mate -> Arduino Pro Mini
GND -> GND
CTS -> GND
VCC -> VCC
TX -> RX (Digital pin 0 on an UNO)
RX -> TX (Digital pin 1 on an UNO)
RTS -> DTR
Hello, I have a question about wiring the Pro Mini and the Bluetooth mate.
DeleteIn your instructions, which are very thorough and clear, you say that these two math perfectly, but when I look at the pins, they don't match.
Pin order Pro Mini:
BLK
GND
VCC
RX-I
TX-O
GRN
Pin order Bluetooth Mate:
GND
CTS-I
VCC
TX-O
RX-I
RTS-O
Both are genuine Sparkfun components.
If you look at the pictures on the Sparkfun site, you will see these pin orders as well:
Pro Mini: http://dlnmh9ip6v2uc.cloudfront.net/images/products/09218-02.jpg
Bluetooth Mate: http://dlnmh9ip6v2uc.cloudfront.net/images/products/09358-03.jpg
How do I need to connect these two so that it will work?
Is GRN the same as GND and BLK the same as DTR?
If so, than the pin order doesn't match in my case.
Don't worry about the BLK and GRN silk-screened on the board, that threw me off a little at first too. If you download the Eagle CAD files you can view the nets for each pin (which is how I generated my list above) and see that everything is fine.
DeleteI've found a drawing on how to connect it:
Deletehttp://books.google.be/books?id=VpA5UtN2LsgC&pg=PA211&lpg=PA211&dq=bluetooth+mate+connect+to+pro+mini&source=bl&ots=3NdniNpF0G&sig=ZhqSSk3xSD8zfGLlz-jScyI0Gk4&hl=nl&sa=X&ei=CIQdT93uIomf-waW9sX3CQ#v=onepage&q&f=true
and you're right.
I still find it kind of strange, but if it works.
This comment has been removed by a blog administrator.
ReplyDeleteHey! Thanks for this tutorial! So I have everything hooked up, PuTTY is receiving everything correctly, and the arduino serial terminal shows the exact same thing. Now, when I press R in the PuTTY terminal nothing happens, the counter just continues, but when I do it in the arduino terminal it resets correctly. Did I miss something? I'm at a loss. Thanks for any help in advance
ReplyDeleteHi Parth,
DeleteWhen you press R in PuTTY does an R show up in the terminal window? You might need to play around with your PuTTY settings... the key thing is that it works in the Arduino terminal, so at least the code and hardware is configured correctly :)
Jon
This is great! It's been a huge help so far, except that I follow the "T"utorial to the "T" but for some reason PuTTY won't establish the connection. I've tried both COM ports just to be sure. Available are COM10 and COM7, but when I enter either I just get the Window "ding - that doesn't work" sound. I've double checked that the BAUD Rate is correct and everything seems to be fine, I just can't open the PuTTY window to send data back and forth to the module.
ReplyDeleteHave you tried using the Arduino serial monitor? I know I've had a lot of trouble getting PuTTY (and other serial tools) to establish the connection with the Bluetooth Mate, even once things were set up properly. Welcome to the world of Bluetooth! Just keep trying to establish the connection within the first 60 seconds of the device being turned on. Sometimes it'll take a few tries.
DeleteFor the mac you use 1234 as the code for bluetooth. Zterm works well for testing as an alternative for PuTTY. Excellent post saved me a ton of time getting things setup.
ReplyDeleteGreat instructions! I was wondering what you connected the clock and data lines on the mini to, and how you connected the FTDI board. Thanks!
ReplyDeleteWow. I was stuck on pairing Windows 7 and the Bluetooth Mate for 2 hours. Adding the bluetooth device without the code did the trick. I am grateful you posted this. Many thanks!!!
ReplyDeleteSo after pairing the device to Windows 7, I was having problems communicating Lynxterm with the Arduino board. So I made sure that the Bluetooth Mate RX and TX were going to the right places on the Arduino Uno. And what finally worked was that on the Bluetooth Mate I connected CTS-1 and RTS-0 together. I use a paperclip to connect those two because the jumper cables I have been using were too skinny.
ReplyDeleteThanks so much for the tutorial and your help, but I'm having a strange problem not listed by anyone else.
ReplyDeleteEverything connects, the putty terminal opens, except instead of the 1,2,3,4,5 etc. it just repeats gibberish symbols on the screen, going left to right. Why would this happen?
Check your baud rate in PuTTY - pretty sure that's the problem.
DeleteIs it possible that it's not working because everything is powered with 5V? I'm using Arduino Nano and bluetooth mate silver.
ReplyDeleteI conected TX-RX,RX-TX,GND-GND,CTS-RTS,5V-5V. When i open serial monitor the green conect led turns on but i'm not getting any data. I set the baud rate to 115200 so that must match.
ReplyDeleteWorks like a charm! thanks for tutorial!
ReplyDeleteThis comment has been removed by a blog administrator.
ReplyDeletehello ...thanks for tutorial but I have a question
ReplyDeletecan we send and receive data from arduino by this Bluetooth in the same time??? how can we do it???
Presumably it's possible, but I haven't tried it. The application I used this module for was a one-way broadcast of sensor data.
DeleteHello,
ReplyDeleteIm using this with an Arduino Micro and while I am getting the Bluetooth to overall work, I cant seem to get into command mode. Have you been able to do this with the mini?
It has been a while now, but I recall it being very tricky to get it into command mode. It shouldn't matter what controller you use. Try cruising the documentation again or looking at the comments on the SparkFun product page.
DeleteHow do you use the 3.3V FTDI USB programmer ?
ReplyDeleteThere are lots of resources out there. Here's one I quickly found that should get you started...
Deletehttps://www.sparkfun.com/tutorials/245
true i wanna know also that;p how to use 3.3V FTDI USB programmer
ReplyDeleteThere are lots of resources out there. Here's one I quickly found that should get you started...
Deletehttps://www.sparkfun.com/tutorials/245
Thanks for the detailed tutorial. I have two questions. If you can answer then I'd be more than happy.
ReplyDelete1) Do you know what is the power consumption of the controller + bluetooth?
2) And secondly do you think the code will work on a Teensy 3.0 and a JY-MCU?
Thanks.
Can we send data from one modem to multiple android phones at the same time?
ReplyDelete