I am the proud owner of a 2007 Hyundai Sonata GLS (base model). While I have been very happy with the car in general, one thing that's annoyed me from the start is the lack of an auxiliary input for iPods/MP3 players. I do a lot of long highway trips, and it always seems as though the moment you find a good radio station it starts to fade out. If you've used one of those cigarette lighter FM transmitter thingers, you know that they suck, especially around big cities, and when you're on the road it's near impossible to find a frequency that doesn't get interference along the way.
Update: See my Stereo Replacement Guide here!
I'm happy with the stock stereo, and I don't have much money to spend on buying a mod kit and a new stereo, so I decided to figure out a way to wire in an auxiliary input.
I couldn't find anything online that gave a detailed description of what to do, so I am going to be painfully detailed here, with lots of pictures. I hope it helps everyone who's still looking for a solution to this challenge.
My first resource was this website, which provided a link to a PDF outlining how to remove the stereo from the dashboard (see page 3). It's pretty straightforward, but I will show you exactly what to do here. [Update: see the link at the bottom of this post for another PDF showing how to remove the stereo]
Before we begin, I do recommend you read through this whole thing before you start, just so there are no surprises. It will make everything go smoother.
Part One: Removing the Stereo
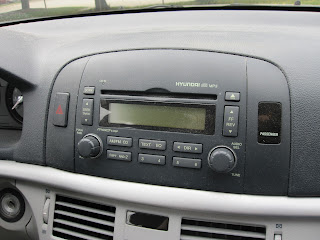
Here's the untouched stereo


Now you can see there are these little white plastic clips that clip onto the strip, and into the dashboard. Fun fact about these little clips: they love to pop off the strip sometimes, and fall inside the dashboard. This is without a doubt the most frustrating and emotionally battering part of this process, since you don't want your dashboard to be all wiggly. Again, if you take care to pull the strip off gently you should be okay, but do expect to lose at least one clip.


Success!


I lost yet another clip, as you can see here.

Repeat with the other panel.

With the panels pulled forward, you have full access to your stereo.

First remove the two screws that attach the darker plastic to the panels (i.e. don't remove that screw in the middle).


With that, the stereo should slide forward with ease. It can't come too far out, so get ready to remove the power and speaker connector shown below, as well as the antenna connector.
The power connector has a little tab at the back which you have to press down before it will come loose. Mine was pretty stiffly in there, so I needed to wiggle it a bit.

Next remove the antenna cable. It was also very snug, so I needed to use a bit of force to get it out.


Now your dashboard has character!

Here are a few pics of the power/speaker connector, for reference. If you are interested in what wires do what, this link seems to describe them. [Update: see the link at the bottom of this post for a PDF showing this connector (24P) and its wiring information]


Then a couple more screws held the CD unit in place.

I had to remove a couple of screws on the outside of the stereo for the CD unit to come out.

The cable that connects the CD unit to the main board just pulls out.

Leaving us with... some electronics stuff!


While there was a part of me that just wanted to leave it like this, I decided it would be best if I finished the job.
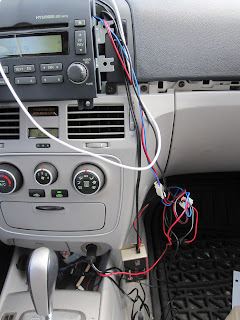
I ran the wires from the box through a hole behind the glove compartment. I wanted to leave the box accessible in case I needed to change the default radio station at some point.

The wires don't seem to get pinched at all if they're bundled and fed through this hole.


Update: See my Stereo Replacement Guide here!
I'm happy with the stock stereo, and I don't have much money to spend on buying a mod kit and a new stereo, so I decided to figure out a way to wire in an auxiliary input.
I couldn't find anything online that gave a detailed description of what to do, so I am going to be painfully detailed here, with lots of pictures. I hope it helps everyone who's still looking for a solution to this challenge.
My first resource was this website, which provided a link to a PDF outlining how to remove the stereo from the dashboard (see page 3). It's pretty straightforward, but I will show you exactly what to do here. [Update: see the link at the bottom of this post for another PDF showing how to remove the stereo]
Before we begin, I do recommend you read through this whole thing before you start, just so there are no surprises. It will make everything go smoother.
Part One: Removing the Stereo
Here's the untouched stereo

My trusted tools for the job: screwdriver, flashlight, thin knife, double-sided tape, skewers, and scotch tape. With these tools you can do just about anything.

Before we start, it's important that you disconnect your battery. So pop the hood and disconnect the wire from the negative terminal of your battery. I skipped this step because I'm experienced with electronics an idiot but that doesn't mean you should ever cut corners and risk hurting or killing yourself by accidentally causing a short.
Okay, with that done, pop open the glove box and remove the two screws that hold in the little silver plastic strip. If your screwdriver can't fit in the space, you can make the glovebox drop lower by unhooking those squarish black plastic pieces on each side of the glovebox.

The first screw.

And the second one.

Now this part is a little nerve-wracking (at least it is for me). With even pressure you need to start pulling out that strip, starting on the glove box end. It's attached to the dashboard by numerous small plastic clips that need to pop out.

Keep going until it's pulled out completely, past the stereo, just up to the steering wheel.

Now you can see there are these little white plastic clips that clip onto the strip, and into the dashboard. Fun fact about these little clips: they love to pop off the strip sometimes, and fall inside the dashboard. This is without a doubt the most frustrating and emotionally battering part of this process, since you don't want your dashboard to be all wiggly. Again, if you take care to pull the strip off gently you should be okay, but do expect to lose at least one clip.

In the above picture you can see that I lost a clip, but luckily I was able to find it with the flashlight after I got the stereo out. That's what the skewers and tapes were for. I constructed a long skewer with some double-sided tape folded over one end (gum doesn't work as well, I've tried).

Success!

Back to it. Now that the strip is removed, you need to remove the panels on either side of the stereo. They are each attached with two more of those white clips, and a single screw on the bottom. Remove the screw and gently pry the panel off the dashboard.

I lost yet another clip, as you can see here.

Repeat with the other panel.

With the panels pulled forward, you have full access to your stereo.

First remove the two screws that attach the darker plastic to the panels (i.e. don't remove that screw in the middle).

Now remove the two screws on each side of the stereo


With that, the stereo should slide forward with ease. It can't come too far out, so get ready to remove the power and speaker connector shown below, as well as the antenna connector.
The power connector has a little tab at the back which you have to press down before it will come loose. Mine was pretty stiffly in there, so I needed to wiggle it a bit.

Next remove the antenna cable. It was also very snug, so I needed to use a bit of force to get it out.


And there it is. Now you can completely remove the stereo and wave it around wildly (not recommended).

Now your dashboard has character!

Here are a few pics of the power/speaker connector, for reference. If you are interested in what wires do what, this link seems to describe them. [Update: see the link at the bottom of this post for a PDF showing this connector (24P) and its wiring information]


Finally, I taped a little reminder up so I wouldn't forget where the radio goes.

Part Two: Taking the Stereo Apart
I wanted to be a cool electrical engineer and figure out a clever way to wire up an auxiliary input into the existing electronics, which naturally requires taking the stereo apart. Spoiler: Nothing came of this so these next few steps are for fun only, you don't need to take the stereo completely apart.
Just one or two screws held the top panel in place.

Then a couple more screws held the CD unit in place.

I had to remove a couple of screws on the outside of the stereo for the CD unit to come out.

The cable that connects the CD unit to the main board just pulls out.

Leaving us with... some electronics stuff!

Essentially the system is made up of a microcontroller (which handles the LCD screen, buttons, functions, etc.) a DSP (which handles the audio processing), and a pre-amplifier system to power the speakers. While I maybe could have gotten something working eventually, it would involve hijacking the DSP or the audio output from the DSP to the pre-amp. I figured either method risks breaking the stereo circuitry or potentially providing a crackly audio signal neither of which I was prepared to deal with. So I chickened out and bought a cheap inline FM modulator from FutureShop. You might be able to get better quality ones for a bit more money, but my intent was to do this as cheaply as possible.

How am does work: Basically this solution sits inline with your FM antenna. The unit is set to a specific radio station, and when you turn it on the unit attenuates all radio frequencies surrounding that pre-set station and modulates its own FM signal at that frequency. It's the same idea as those cheap FM transmitters you can buy, however this solution won't experience the same interference from outside stations.
It's not an ideal solution as FM audio bandwidth is limited, and there are always losses involved with encoding and immediately decoding and filtering an FM radio signal. But it honestly isn't that bad.
Taking it out of the packaging and pulling it all apart we can see that its connections are an antenna input and output, as well as a pair of wires for power. They feed off the same ~12VDC supply the radio gets from the battery.

Since the Sonata doesn't provide a spare power connection behind the dash, I had to wire up the power on my own. Finally, an opportunity to prove my electrical skills! The ground wire I just mechanically fastened to the enclosure with a nut and bolt, and the power line I soldered to the back of the protection diode beside the connector. This connected me to the constant power line which I thought was most appropriate. To do this, you might want to just strip back the power wire near the connector instead of taking the stereo apart.
In hindsight, I should have wired the +12V line to the striped Orange/Black switched power line. That way, the FM modulator box could only be turned on when the car is started or the key is in the accessories position. The way it is now, this unit can be turned on at any time, which means that if I forget to turn it off before I leave the car, it will drain the battery. I can live with that, so I'm not about to take everything apart again, but I wouldn't wire it up the same way if I ever had to do it again.

Part Three: Putting Back the Pieces
With accessible power wires, we're ready to put everything back together again. Just to be sure, I hooked up the transmitter to the stereo without putting everything in place, just to make sure it all worked.

It did work, which is usually a good sign that it works.

While there was a part of me that just wanted to leave it like this, I decided it would be best if I finished the job.

I ran the wires from the box through a hole behind the glove compartment. I wanted to leave the box accessible in case I needed to change the default radio station at some point.

The wires don't seem to get pinched at all if they're bundled and fed through this hole.

I stuck the control unit near the light inside the glove box. I really wanted to somehow feed this through to the dashboard near the radio, but it wasn't looking like an easy job.

With everything tidied up, I did one final test before putting all the screws in, and reattaching the strip to the dashboard.

All was good, and a headphone cable can slip out of the top of the glove compartment without getting pinched badly.

Everything looks as good as before, and it even still works! I'd call that a success.

I hope this guide was helpful and informative! While I know this isn't the ideal solution to the problem, I do think it's the cheapest most practical solution for this car. I've been using the AUX input with my iPod for a month or so now, and I have to say it's pretty good. I'm not blown away by the audio quality, but I'm definitely happy enough with it.
Update: Thanks Mike for supplying these PDFs outlining how to remove the stereo and the connector wiring!
Glad I'm not the only one who had problems with the Sonata's stereo system! I replaced the stereo in my 2006 sonata three years ago so I could have an aux input (and iPod and USB). I also installed a SWI-JACK so I could control the new stereo with the existing steering wheel controls. I probably lost or broke two or three of those white clips from that dash strip - but they were far enough apart enough that it still holds tightly. Something like aux input should be standard everywhere these days.
ReplyDeleteI would like to provide you with the correct documents for this. including proper dash removal, and wiring guides. I will post them in a second
ReplyDeletewant to remodel my old philips two in one cassette player in a brand new boombox, if anyone can help me with this, want to get the cassette player out and insert right there an aux port and two usb port without any change in the looks with the device,
Deletewaiting for your comments at sanatanshandilya@yahoo.in
Please feel free to add this to your guide.
ReplyDeletehttp://www.mediafire.com/?iyj717s3f2ug3ex
Thanks Mike! I have added your link to the post
ReplyDeleteAll this hassle just to put FM transmitter power out?
ReplyDeleteYou could find datasheet for audio amps, and splice the inputs (add few resistors of few Kohm in series with input to deal with output resistance shunting from previous pre-amp stage), when you switch to CD and don't play anything (it does not have aux choice in menus does it?) you can inject/feed your signal in...
That's definitely the strategy I was considering most, however I wanted to do a proper job of it, and didn't want to risk blowing any components. I also would have been mad if I injected noise into the audio signal from doing a sloppy job. I don't have any equipment here other than a cheap DMM, so I deemed that approach too risky. I might try again some day down the road when I have the money to pay for any mistakes, and when I have access to a nice hardware lab.
ReplyDeleteThanks for the detailed information and pictures. I bought mine with an aftermarket stereo/nav system (AVN 5500), which has THE RCA inputs for aux in, but its very snugly fit inside the stereo cavity. First attempt I gave up, put it all back, planning on trying again. I was considering drilling some holes on the driver side console to snake the input cable out. Do you think this is worth giving a shot ? Yours appears to be the easier solution, gotta admit.
ReplyDeleteI'm not 100% sure where exactly you're thinking of putting those holes, but my general advice is not to mess around with stuff too close to the steering column, since things could get out of hand fast. I got a panel mount push-button and stereo jack to try to bring out those controls from the glove box but I still don't know where to put them...
DeleteYou're right, putting holes anywhere near the steering dash column isnt a smart plan. Since the AVN5500 had audio/video input for the in-dash unit, i didnt have to mess around too much, but getting to the rear-panel was quite a challenge. I had to release the entire passenger side glove compartment box, which is about 5 mounting bolts and 5 screws. I pulled out the SiriusXM Radio receiver (which never worked anyway), and snaked thru the wire-mesh to the back panel. The one useful tip I realized is that theres a quadrilateral opening at the point of conjecture of the center and side panels, which was PERFECT to pass the cable from. Incidentally, the cable that ends up very winding, is a benefit, cos if I tug the Aux input from the outside, the wound cable serves as discontinuity and ensures I dont pull out the plugs from the rear panel of the in-dash unit.
DeleteI obv didnt get any player controls on the 7"screen, which I was pretty sure I wouldnt anyway, since Im only sending an audio signal thru a 3.5 mm jack.
That said, it works like a charm, the aux in works, and this detailed tutorial provided some much needed insight for a rookie such as myself, thanks again!
PS - I lost 3 white clips ... DANG !!!
how to I get the the screw out?? it wont come out on the left side panel of the radio compartment
ReplyDeleteHey Mike, I just want to thank you sincerely for making this guide. Helped me so much. Couldn't find anywhere that gave as nice directions as you. Cheers!
ReplyDeleteVery informative, this really helped and saved me from expensive replacement stereos just for an auxiliary input. THANK YOU
ReplyDeleteMan - The stereo screws are so tight in my Sonata 2006 is that I can't open no matter how hard I try(after being soft). The screw heads got warped when I used more force. I even tried using Hitachi handheld screwdriver. It seems I can't open without damaging something which I don't want at this time. The bottom 2 screws of the stereo were fine. Btw I lost some plastic clips but I am not worried about them. The article is perfect. Do you know how it feels when I am so close.
ReplyDelete-ss (PA)
Hi Guys,
ReplyDeleteI have ordered one of those Chinese aftermarket car dvd stereo players with all those (cheap? crappy? dodgy?) useful functions. I was unsure how to install it and that brought me onto this website. I have doubted a while about ordering one of those systems but I decided to give it a go and hopefully it is good.
This is the one I ordered:
http://www.aliexpress.com/snapshot/231849125.html
I am planning to write a similar guide to this one and if there are any of you who are interested in pictures I am happy to email them to you.
Cheers,
I would like to know how this install went for you.
DeleteThank you for this site! I've been trying to figure out how to get a CASSETTE system (both CD and CASSETTE) up and running in my 2006 Sonata GL, but they're becoming as rare as hens' teeth.
ReplyDeleteMaybe this is the answer.
Looking forward to your guide, Tim K!
Hi, I've got a issue maybe somebody can help with -- I cut and stripped the orange/black wire in the back of the audio unit to try and get 12V for the FM modulator, but now I can't detect that it's a live wire at all (shows up as 0V on the multimeter). For a second I thought maybe it was the wrong wire (even though it matches up with the schematic diagram as an ACC wire) but when I reconnect it and try to turn the audio unit on, I get nothing. Just to clarify, the car battery is reconnected and keys turned to ACC when I'm testing for the voltage.
ReplyDeleteIs it possible that I cut the wire while trying to strip it? Is it that fragile?
Also checked the fuse for the audio unit just in case, looks fine.
Anyone having similar issues, I don't know exactly how, but I blew two fuses, for the clock and power outlet, but not the audio unit (I think the clock is the relevant one in this case, weird I know) while trying to get the power source, and once I replaced both of those fuses (located in a pop-off side panel on the driver's side, see the sonata owner's manual for detailed diagram) I could use the orange/black ACC power source as planned and it's all working!
DeleteAlso, I used this FM modulator from Amazon (http://www.amazon.com/iSimple-IS31-Antenna-Modulator-Aftermarket/dp/B002U5XPBE), different to Jon's, and it worked perfectly
I had a CD stuck in my car for months and it wouldn't eject. I see that many people have had the same problem. I don't have a fix for it, but I followed your instructions here to remove my stereo and remove the CD unit from it and manually extricate the disc. Your instructions worked like a charm. I thought this was going to be a 6-hour job with requisite cursing and flying objects, and that my dash would never be the same. It turns out that everything's going to be ok. ;-) Thanks!
ReplyDeleteThis comment has been removed by the author.
ReplyDeleteI'm glad I stumbled across this blog today as I was getting ready to install an iSimple IS31 FM modulator (http://amzn.to/1dJNv1b) in my 2007 Sonata. Took me roughly 20 minutes from start to finish. Thanks for the guide!
ReplyDeleteThanks Jon for this post!
ReplyDeleteMartyEmerick I'm planning on getting the iSimple as well. Which instructions did you use to power it (striped Orange/Black switched power line or soldering)?
Harry, I used the iSimple, and took the power from the orange/black ACC line in the back of the radio. Stripped it, attached the iSimple live wire and taped it up with electrical tape, no soldering needed if you do a good, clean job with the taping. Does the job perfectly.
DeleteIf you accidentally short it (which I did somehow, and knew because the red/orange line showed as 0V on the multimeter), check the fuse box on the panel to the left of the driver's side (side facing the door). My clock fuse had power outlet fuses had blown out. Simple, cheap fix if you accidentally do this!
clock and power outlet fuses*
DeleteThanks for this write-up. It helped me out with a recent install in my 2008 Sonata.
ReplyDeleteI put in a Parrot mki9100 unit and I can't recommend it enough. Gives you bluetooth, usb, aux, and ipod connector plus a tiny remote so you can leave your phone in your pocket if you go the bluetooth route.
Very great article!!!Thank you! It helped me to understand where it was wrong in my case...I had problem exactly with aux swithes..I couldn't find normal. Maybe I missed something but can you tell me detail name of your aux switch...and where did you bought it...Last time I got this one http://hardware.nl/hulpschakelaar/siemens but it is so expensive and I can't allow it for myself again.
ReplyDeleteFuture Shop may be dead and gone now, but these devices are still readily available:
Deletehttp://www.amazon.com/iSimple-IS31-Antenna-Modulator-Aftermarket/dp/B002U5XPBE/ref=sr_1_1?ie=UTF8&qid=1446955387&sr=8-1&keywords=car+inline+fm+aux+input&pebp=1446955393072&perid=1BFHQGRHX301TCD07VB3
I stumbled across your page from a pseudo-related Google search. Even though I saw quickly that your discussion didn't address my issue, it was so entertaining that I read the whole thing! Great job.
ReplyDeleteHi man, Hopefully you still reply to posts on this blog. I successfully installed the AUX cord and everything works. In the process of putting everything back together i dropped a couple things and they fell down behind the heating/cool knobs. Any idea how to remove the paneling below the stereo to retrieve those things? :)
ReplyDeleteHi, sorry, I don't specifically know how to remove that panel. I'd imagine there are a number of fasteners for the panel behind the trim (I can see some screws in my photos), but there might be some others hidden. I'd start by taking out the screws clearly fastening the panel to the rest of the dash and then gently pull the panel out to see where the other fastening points are. Good luck!
Delete